How to do a stocktake in Shopify, step by step
A stocktake means counting what's actually sitting on the shelf and reconciling it against the quantity Shopify's system shows. Here's the full process (prep, choosing a counting method, scanning versus manual entry, reconciling variance, and applying the adjustment) whether you run it on a spreadsheet or with an app.
The steps below work with any counting method. Binly's stocktake tool is included on every plan, including Free.
Freeze movement before you count
Pause receiving, picking, and manual quantity edits for the location you're counting, otherwise the number you're comparing against keeps changing while you count it.
Organize by shelf, then count in order
Group your count sheet or app by shelf, bin, or location before you start, so counters move through the floor once instead of doubling back.
Recount before you adjust
A one or two unit gap is normal shrinkage. A large or unexplained variance is worth recounting before it gets applied to Shopify as a permanent adjustment.
See it in action
What counting actually looks like
Scan a barcode, or type a quantity, the counted number sits next to Shopify's system quantity as you go, with any difference flagged immediately instead of after the fact.
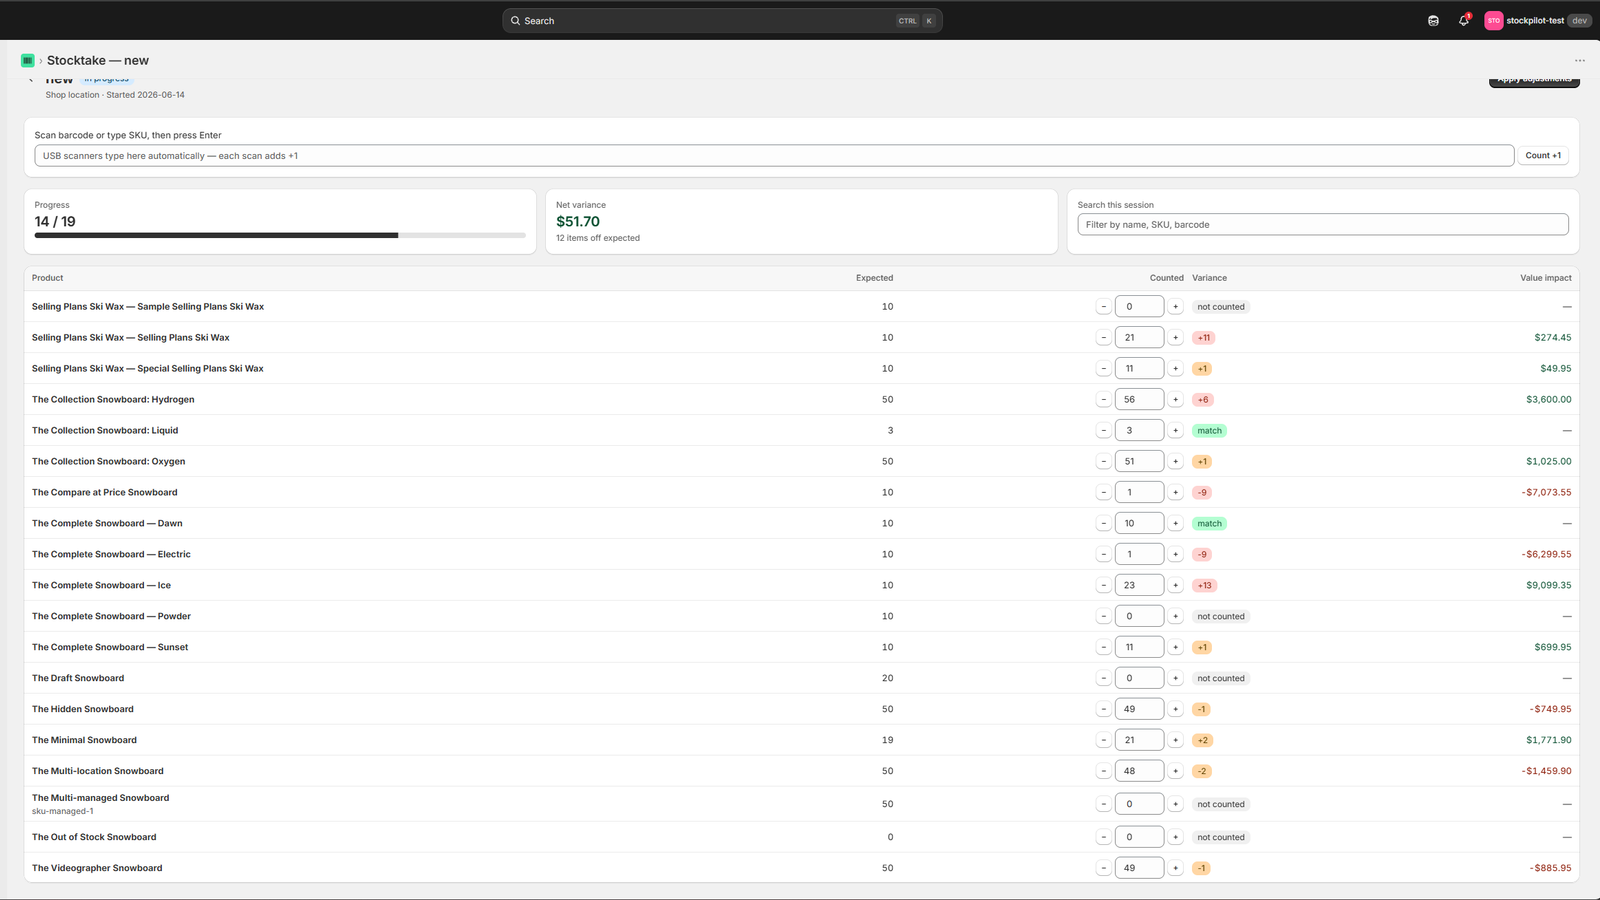
Click to enlarge
The real Binly counting screen, the one referenced throughout this guide.
Why it matters
Why a stocktake matters, and when to run one
Shopify's quantity field is only as accurate as the last time someone checked it against the shelf. A stocktake is that check.
Every store that carries physical stock loses a little accuracy over time, a miscount at receiving, a return that never got logged, a mis-scan at the register, or plain shrinkage. Shopify doesn't catch any of this on its own; it just keeps showing whatever quantity was last recorded. A stocktake is how you find out how far that number has actually drifted from what's on the shelf, and fix it.
Why it's worth doing
- A "system says 15" number you don't trust makes every reorder decision and every "in stock" label on your storefront a guess
- Shrinkage and miscounts compound quietly for months between counts if nobody's checking
- You can't spot a shrinkage trend, a receiving problem, or a mis-picked SKU without a real count to compare against
When to run one
- A full count of everything at least once or twice a year
- Before and after a busy sales season, when volume and returns both spike
- Any time a number in Shopify looks obviously wrong and you need to find out why
- Smaller, more frequent cycle counts on your top sellers, in between full counts
Full count
Every SKU at a location, counted in one pass. Accurate, but disruptive, usually run outside business hours, a couple of times a year.
Cycle count
A rotating slice of the catalog (top sellers, or one aisle a week) so counting fits inside normal operations instead of shutting anything down.
Full or cycle
Full count vs cycle count
Most accurate stores run both.
| Full count | Cycle count | |
|---|---|---|
| Scope | Every SKU at a location | One shelf, vendor, category or saved list |
| When | Quarterly, at year end, or after a big receiving day | Weekly or biweekly, on fast movers |
| Disruption | Higher, often run outside opening hours | Low, fits into normal trading |
| In Binly | The same count screen | The same count screen, scoped smaller |
Step by step
How to do a stocktake in Shopify
Six steps: pick your method, prep the floor, count, reconcile the variance against Shopify, apply the adjustment, and put the next one on the calendar.
Choose full or cycle count
Freeze & organize by location
Count: scan or manual
Reconcile the variance
Apply the adjustment
Schedule the next count
Choose full count or cycle count
A full stocktake counts every SKU at a location in one pass, accurate, but disruptive, usually run outside business hours a couple of times a year. A cycle count works through a rotating slice of your catalog, like your top 50 SKUs or one aisle a week, so it fits inside normal operations. Most accurate stores run both: see our Shopify inventory count guide for the counting logic behind each.
Prep: freeze movement, organize by location
Freeze stock movement for that location first, pause receiving, hold outbound picks, and stop manual quantity edits in Shopify until the count is done, or the number you're comparing against will have already changed. Then organize the space itself: group products by shelf, bin, or location, and order your count sheet or app the same way, so counters move through once instead of doubling back.
Count: scan barcodes or enter manually
Count each location and record the quantity you actually find, not what you expect to find. Scanning a barcode with a phone camera is faster and removes typos and SKU mix-ups; if your products aren't barcoded yet, see our guide to Shopify barcode labels. A manual tally on paper or a spreadsheet still works, it's just slower and more error-prone at scale.
Reconcile variance against Shopify's system quantity
Compare each counted quantity to what Shopify's Inventory page currently shows for that variant, that difference is your variance. A one or two unit gap on a handful of SKUs is normal shrinkage. A bigger gap, or the same pattern across many SKUs in one location, is worth a recount before you touch anything in Shopify, since acting on a miscount just replaces one wrong number with another.
Apply the adjustments to Shopify
Once you trust a variance, apply it so Shopify's system quantity matches what's physically on the shelf. Do this for every counted variant, including the ones with zero variance, that confirms the count actually happened rather than being skipped. That means editing quantity on Shopify's Inventory page one variant at a time, or applying a completed count in bulk if you're using a stocktake app.
Do it again, on a schedule
A stocktake is only useful if it's followed by another one. Put a recurring full count on the calendar, quarterly is common for smaller stores, and layer in cycle counts on your top sellers more often. Stores that count regularly find small, explainable drift; stores that let a year pass between counts almost always find something bigger.
Coming from Stocky
If you ran stocktakes in Stocky
Stocky's stocktake tool counted your whole catalog and reconciled it against Shopify in one pass. The steps in this guide work whether you replace that workflow with a spreadsheet or with another app.
Stocky itself stopped working on August 31, 2026, so whatever stocktake process you were running there needs a new home now, whichever replacement you choose.
Pricing
If you'd rather not run this by hand
The steps above work with a spreadsheet and a count sheet. Binly runs the same process with a phone camera and live variance instead.
FAQ
Common questions
How do I do a stocktake in Shopify?
Shopify itself has no built-in stocktake workflow, just a quantity field you can edit per variant. To do a stocktake, freeze stock movement, organize your shelves by location, count every item (by scanning or by hand), compare the counted quantity to what Shopify's Inventory page shows, and then edit each variant's quantity to match what you actually counted. An app like Binly handles the counting, comparison, and bulk adjustment in one flow instead of a manual spreadsheet.
What's the difference between a full stocktake and a cycle count?
A full stocktake counts your entire catalog in one pass, usually a couple of times a year. A cycle count is smaller and more frequent (one shelf, one vendor, or a rotating slice of SKUs) so accuracy gets checked continuously instead of only during the big annual count. Most stores that stay accurate run both.
Should I count inventory by scanning or by hand?
Scanning is faster and removes typos and SKU mix-ups, since the barcode matches the product automatically instead of relying on someone typing a name correctly under time pressure. Manual counting on paper or a spreadsheet still works for low-value or bulky stock, but it's slower and more error-prone as your catalog grows.
What do I do with the variance after counting?
A small variance of a unit or two on a handful of products is normal shrinkage and safe to apply directly. A larger gap, or the same pattern repeating across many SKUs in one location, is worth a recount before you adjust Shopify, applying an uninvestigated miscount just replaces one wrong number with another.
How often should I do a stocktake?
A full count once or twice a year is a common baseline for smaller stores, with cycle counts on your top sellers running more often, weekly or monthly, in between. Stores that count regularly tend to find small, easy-to-explain drift; stores that wait a full year between counts tend to find something much bigger.
Can I count while the store is open?
Yes, if you deal with the sales that land mid count. In Binly each counted line keeps the Shopify quantity from the moment you counted it, so a sale does not vanish when you apply the result. On a sheet, freeze movement for the area you are counting instead. More in our guide to counting while you sell.
Do I apply lines with zero variance?
Yes. Apply every counted variant, zero variance included. That confirms the count happened and you did not skip a line. In Shopify itself it means editing each variant's quantity on the Inventory page one at a time, while a stocktake app can apply a finished count in bulk.
Stop guessing what's actually on the shelf.
Run your next stocktake in Binly, scan to count, see variance instantly, apply straight to Shopify.
Start free 7-day trialNo credit card required